
DIY Enamel Pin Felt Banner


I love the enamel pin collection that I have, but hate that I don't have somewhere to store and display them. While most of my pins are from Disneyland and are pinned on my badge lanyards, the collection I've received from my Loot Crate subscriptions and other places have nowhere to live but in a sundae bowl on my dresser. The bowl is pretty, but not really efficient for me to grab what I want and run out the door.
Placing the pins on display was the only route for me to go! I wanted to make the display myself by using what I had from my craft stash and took to Pinterest for ideas. I had originally found this enamel pin banner but I didn't have any dowels or enough felt to work with. Why not make a bunch of little banners instead?!
Here's what you:
- Felt sheets (I used 2 letter sized sheets)
- Embroidery thread
- Embroidery needle
- Scissors
Easy enough, right? Don't worry. This project doesn't really get much harder. In fact, I got everything done in just a couple of hours. It might take you less because I was watching YouTube videos the whole time.
Instructions for Making Your Own DIY Enamel Pin Felt Banner:
- Fold your felt into thirds down (like you would a letter), and then again. You should get a rectangular shape like I have above. This will help you get your basic shape. If you need it to be more accurate than that, I recommend cutting a cardboard box to size. Keep in mind, though, that not all felt sheets are perfect in dimensions. I ended up with some that were a little mismatched in size and just trimmed them before sewing.
- Cut the feel sheets down into rectangles. Then, cut the rectangles into the banner shape by cutting inward and slightly up from the corner. A good cheat for this is to fold the rectangle in half the long way and cut that way. This helps with making sure both sides are the same length and angle.
- Join two pieces together by doing a blanket stitch. I used this easy tutorial on how to do the blanket stitch as I was making this banner. I thought about using glue, but didn't want to wait for the tacky glue to dry or wait for the glue stick gun to heat up. If you do the glue method, make sure that you use a thin layer at the edge so you don't have to worry about the pins. I alternated the colors only because I had gray and black. If I wasn't using left over parts, I probably would have made the banner silver or ivory and all one color.
- String the pieces together. I used a long piece of embroidery thread (all 6 strands) and did a basic stitch from beginning to end, while leaving a long piece at both ends to knot off for hooks. (For some reason, evidence of this part is missing and I apologize.)
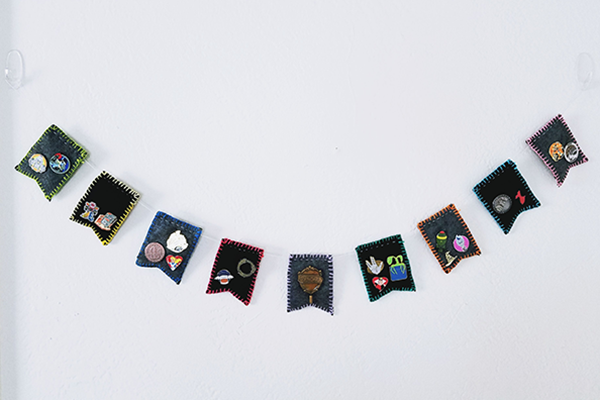
- Hook onto the wall, and attach all your pins! I used 3M hooks because I rent and its an easier clean up for me when I move out. I kinda like how these clear ones make everything look like they're floating about.
I hope you enjoyed this quick little tutorial that I made on a simple Saturday evening. I actually made this a few weeks ago and have been enjoying having them all so conveniently laid out. I'm actually thinking about moving it to my office and have it as part of my streaming background. If you watch me on Twitch or Youtube, be on the look out for that in the next couple of weeks!
Let me know in the comments below how you display all your enamel pins!

