
Silk Flower Winter Wreath

Ever since my wedding in October 2016, I have been obsessed with making silk flower wreaths. Especially ones using a grapevine wreath for the base! Grapevine wreaths make for great bases no matter the time of year, and can provide you with a platform that is very forgiving and reusable if you don't glue anything down. When combined with silk flowers, you can create a piece of home decor that can be reused year after year.

I was struck with a bit of late winter inspiration last year while shopping in the silk flowers section at my local Hobby Lobby. I saw all these wonderful dark flora near the bright spring colors and knew I had to make something with them! The best thing is that these are commonly found flora year round. The coloring might be slightly off, but the pieces are ones that I still buy today!
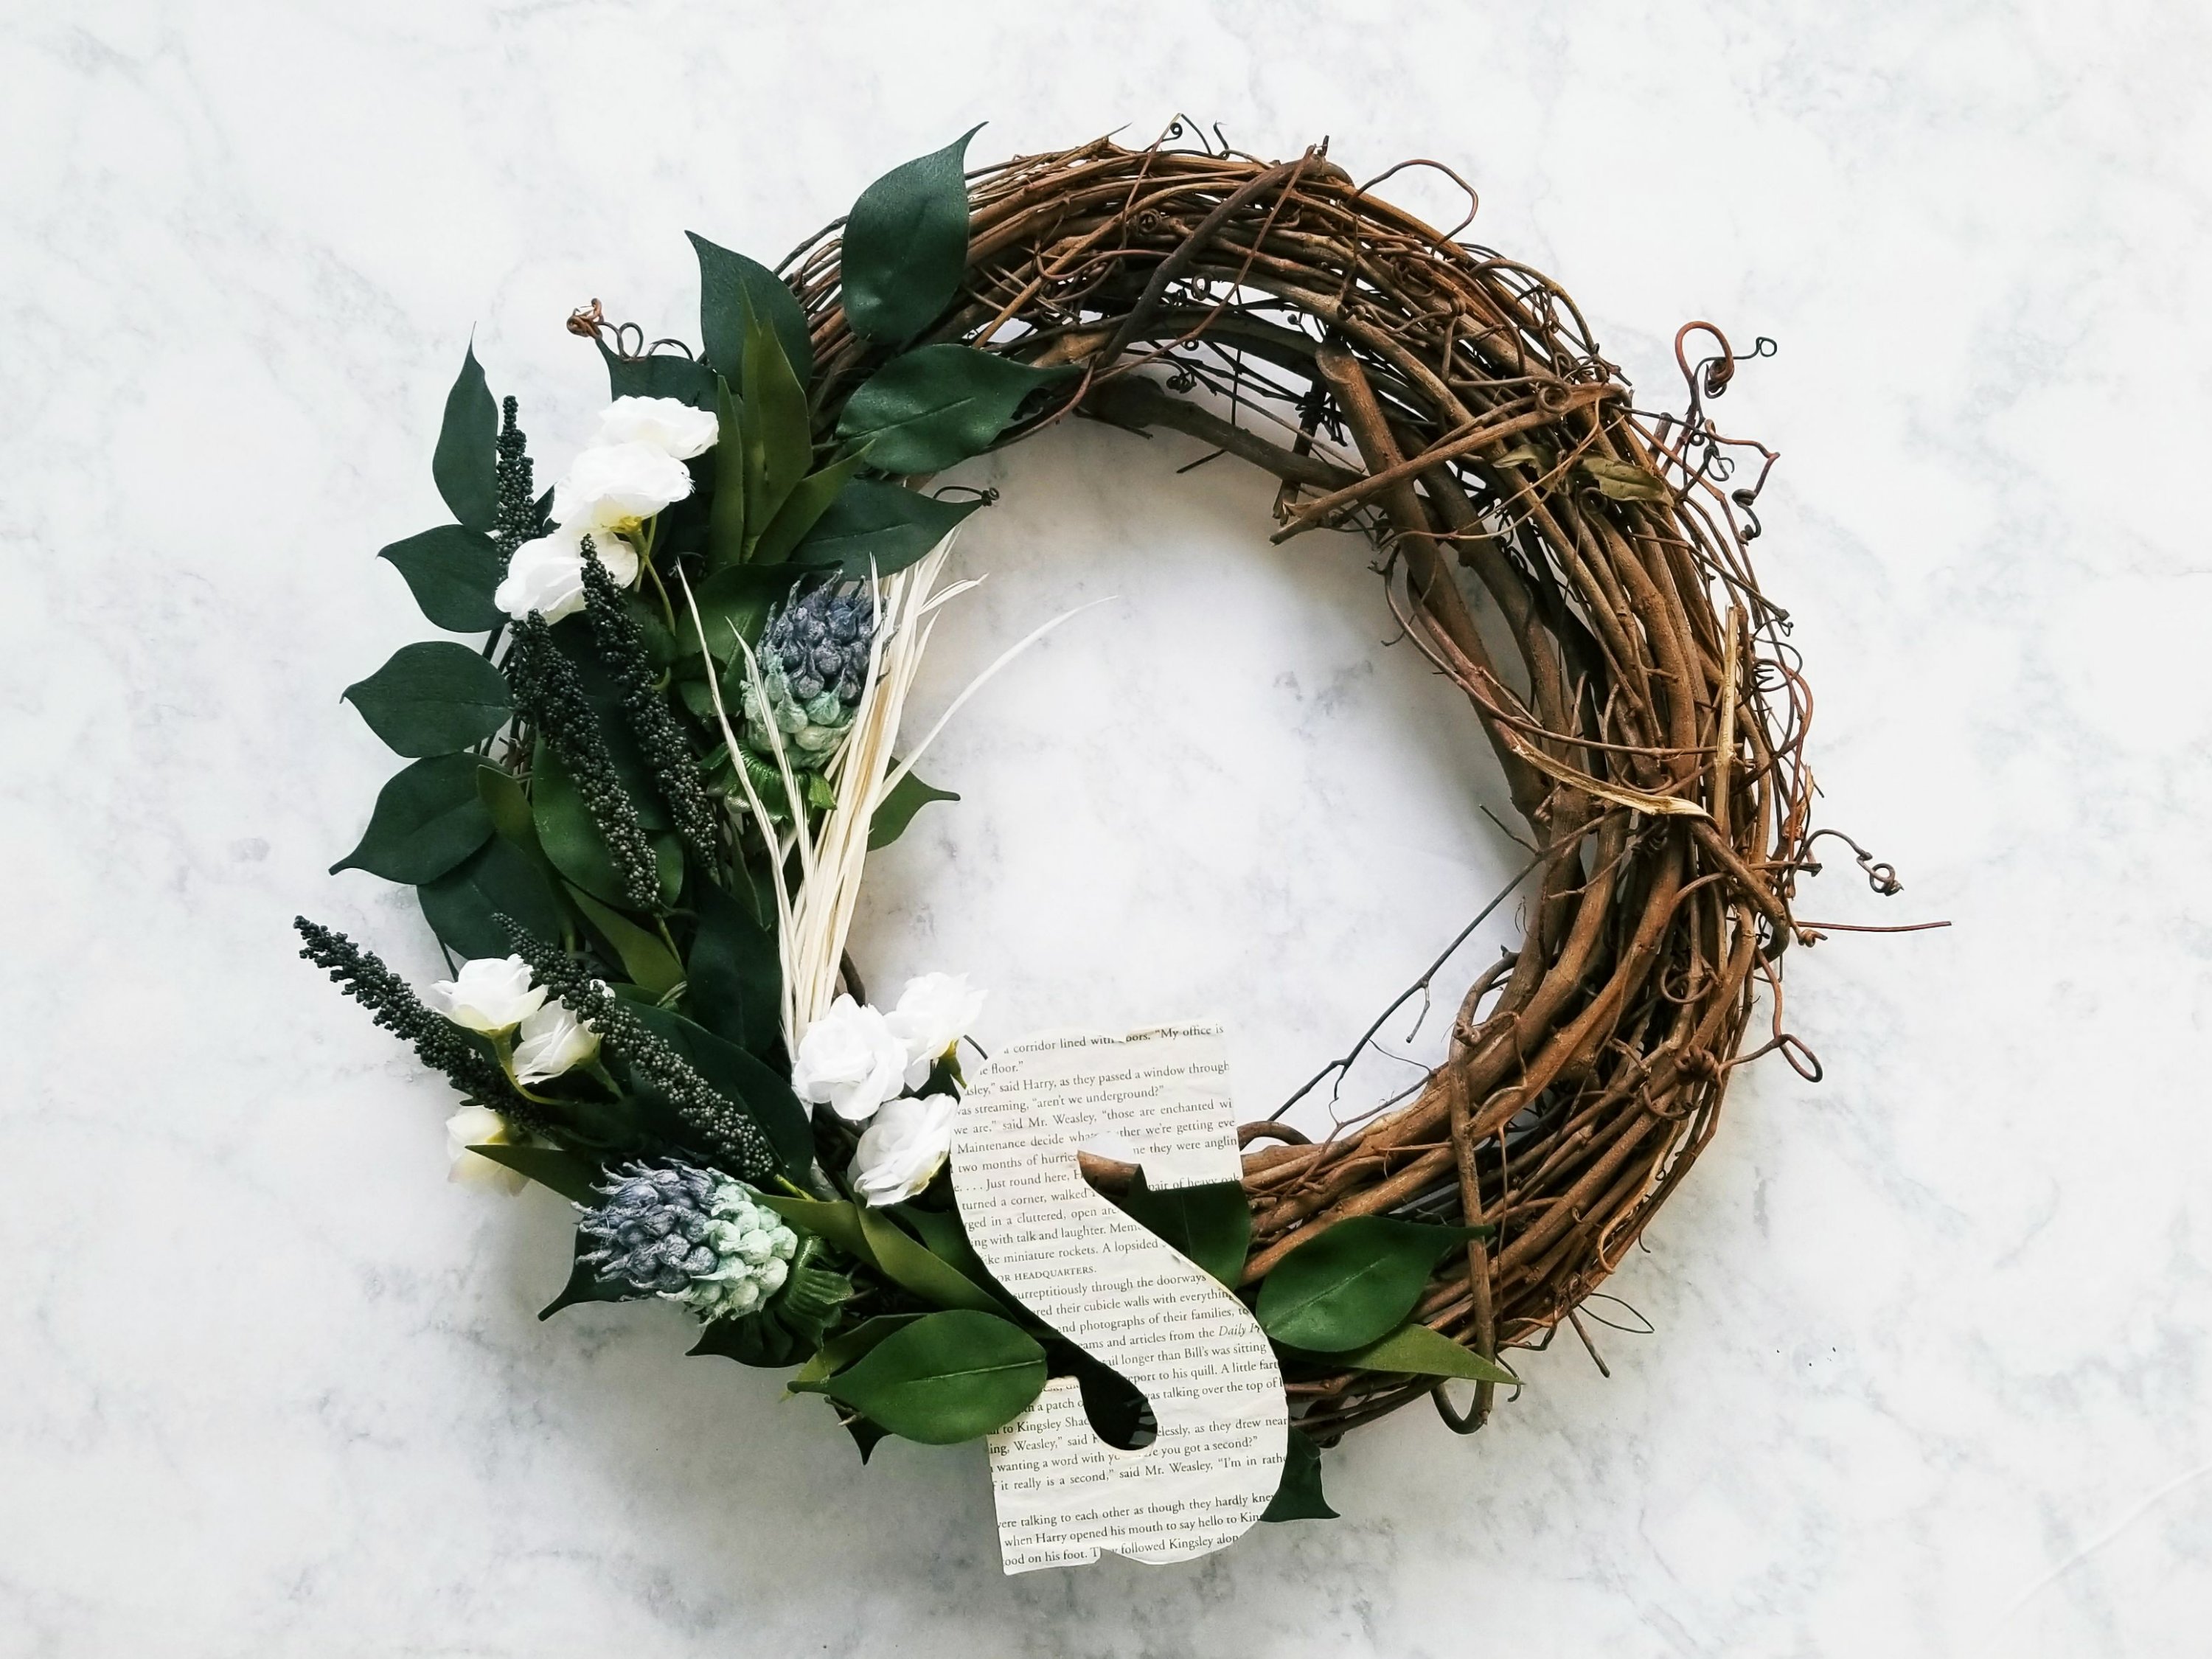
For this silk flower wreath, I started out with a captivated eye for these Cynara Stems. I'm pretty sure the color I got was blue. If you have a store local to you, I highly recommend popping in and checking out all the color variations in person. They're quite the sight!
Tip: if you're like me and build your wreaths around one flower stem, playing off the colors in the stem is the best way to get a cohesive design. This is especially true if you're working with a type of flower you've never used before.
Roses almost always end up in a wreath design for me. I found these white Tea Roses and they blended perfectly with the Cynaras. While I was holding them up to view them, these Cattail Sprays happened to be in the background and looked just so cool that I had to grab them, too. The foam-like leaves really had me for a second. I was pretty concerned throughout my entire shopping trip that they would be a very strange texture among everything else on the palette. In the end, I'm glad I stuck with them. I ended up liking them so much that I've used alternate colors in tons of other projects!
To tie them all together and wrap up the assortment, I grabbed these Green Ficus leaves and a little feather spray similar to these. Since I didn't like just how drastically different all the leaves were, I wanted to get a set of leaves that could act as a sort of replacement. The feather spray I just wanted to add because I wanted a couple of non-floral items on the wreath. Sometimes, you just want to be a bit different! I picked leaves that were dark like the stems and feathers that were light like the roses.
The last thing that I grabbed at the store was a wooden letter S to decoupage with some leftover Harry Potter pages and add to the final product.
Overall, my final total was about $14 after tax, since everything I purchased that day happened to be 50% off except for the wreath (which I used their 40% weekly coupon on). That's the great thing about Hobby Lobby; every once in a while they will have killer deals on their floral department items and it helps to get a really inexpensive project. I still have so many pieces leftover to use for other projects in the future since I was only planning on doing a partial layout on this wreath!

Here's what you'll need:
- Grapevine wreath
- Floral stems
- Hot glue gun and spare sticks (I went through 3-4 for this project)
- Mod Podge & brush
- Wooden letter
- Decor & tools for your wooden letter (this can be glue and paper, or can be paint and paint brushes)
- Floral wire cutters
- Scissors
- Craft Knife
Here's what you do:
The first thing I suggest doing is taking all of your pieces and playing around with how you want to lay them out. Once I've got a layout I like, I take a picture with my phone's camera to use as a reference point as I work.
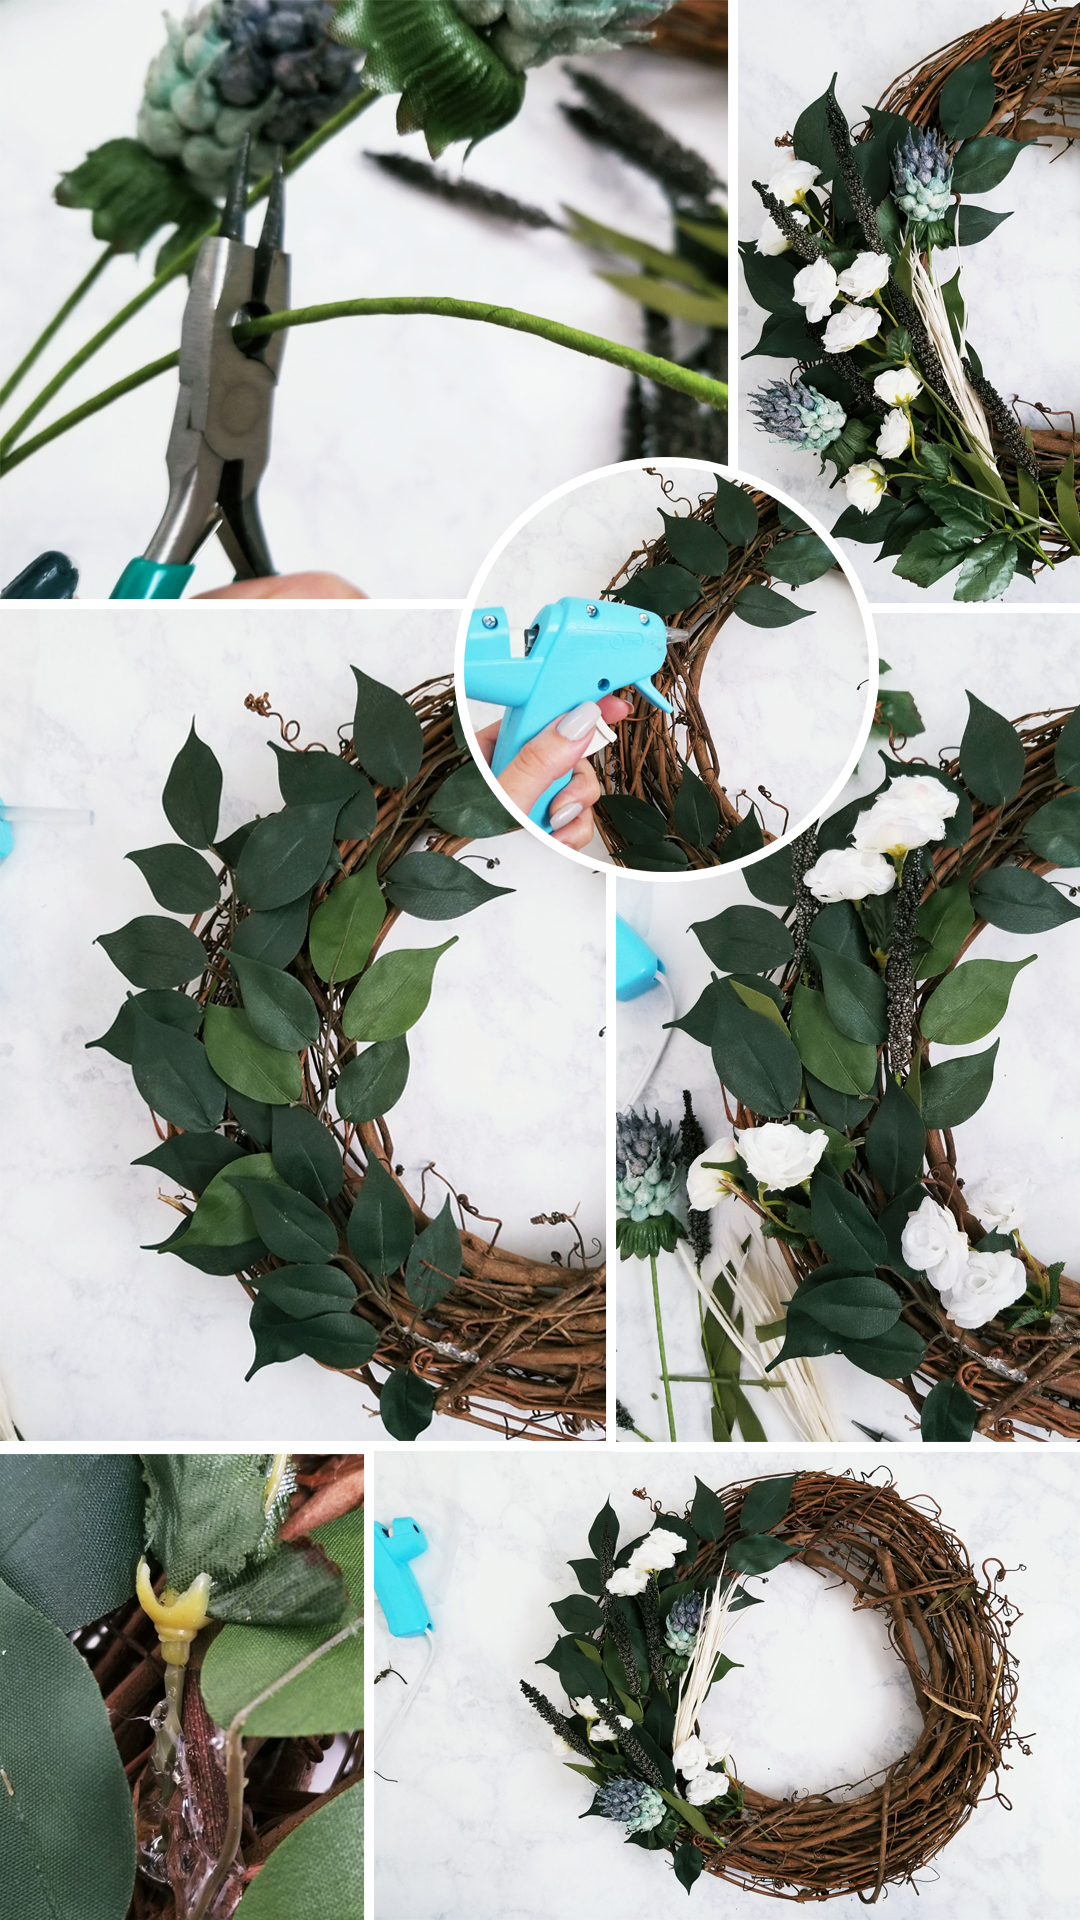
Next, cut all of your stems to size. I suggest leaving a little extra stem length since its always easier to trim later on if you need to. If you're using replacement leaves like I am, remove as many leaves from your flowers as possible. I left the leaves on the Cattail Sprays because I really liked how they looked with some of the lighter Ficus leaves.
Place your stems onto the grapevine. You can use your glue gun to glue the stems to the grapevine, or weave them into the vines to hold them in place. Keep in mind that the second option doesn't usually hold up well against strong winds and storage. If you really want to keep this specific layout for a long period of time, I suggest gluing them down. Tip: glue your leaves down first, and use the glue sparingly. You can shift the leaves around later to help hide unsightly glue dots or blend the flowers in.
Cut your paper to size for your wooden letter. Spread your glue using a brush to even coat the surface of the letter. Place your paper of choice on top. Since a page from the paperback version was larger than the letter, I simply placed the letter completely on the page. Allow the glue to dry before trimming the excess paper off. I don't recommend folding the excess paper over and gluing to the back with this particular wooden letter. I will admit that this was my second attempt at sort of decoupaging the letter as the first one came out terribly. Really glad the cost of the letter was only $2 since the first one wasn't salvageable at all. Coat the top of the letter with a thin amount of glue and allow to completely dry before attaching it to the wreath. This will help protect the letter against weathering.
Glue the letter to the wreath. I recommend using a good amount of glue for this. If you're not gluing anything down to the wreath, you can always take brown floral wire and glue that to the back of the letter. From there, you would just need to weave and/or wrap the floral wire to the wreath.

Once everything is dry and in place, hang your wreath on your front door and enjoy! I've already gotten a few compliments on my wreath and it's only been up for a few days! Wreaths are a great way to dress up your entry way, especially if you may not have the ability to do so otherwise.
Let me know in the comments below what type of flowers you used in your silk flower wreath! I'd love to hear from you!


1 comment